Monday, November 16, 2015

Antique Dining Table Makeover


I recently graduated college and was living on campus so I had to get my own apartment pronto for work. I had nothing but a set of plates that would be able to work in my new apartment. My Nana was cleaning out my sweet late Great Grandmother's house about the same time and wanted to know if I would like any of her furniture. I didn't quite see the promising future in this dining set but my mom insisted we could fix it up good as new!


The chairs were still very sturdy and made with high quality wood. However they were needing some serious cleaning and new cushions. The seats were made of plastic fabric and had no cushion.


We sprayed them with ivory spray paint. Yes, you read that right! Basic Krylon Ivory Spray Paint


Mom is a master of upholstering chairs. She cushioned and re-upholstered them with blue fabric from Walmart.

What little bit of hope I had was in the table. It was sturdy and beautiful. Mom lightly sanded and then lacquered the top. 


Using the same spray paint from the chairs, I sprayed just the bottom and legs of the table.


As you can see in the picture the table has gorgeous hints of green in the wood grain. Also you can see a little bit of design left on the edges.


We found some pretty white and tan linen curtains from Target and a shell picture at Homegoods. 


My entire apartment has a beach theme so we found the straw placemats, seersucker napkins, and conch shell bowl at Home Goods. I bought the starfish and sand dollar at Calahans of Calabash store in Calabash, NC. The crown salt and pepper shakers that I found at an antique store years ago and I've been dying to use them.

Friday, November 13, 2015

DIY Monogrammed Graduation Cap


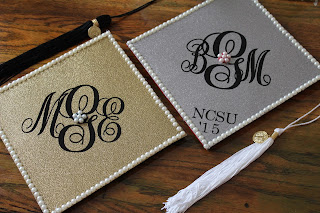
I recently graduated this past May from college and I couldn't just leave my cap and gown plain. I got my gown embroidered with my monogram and I decorated my own cap. I've inserted a picture of it below.


Recently I was contacted by a friend that wanted me to help her decorate her cap similar to mine for her December graduation. I agreed instantly and like always I spoke too soon without really thinking about my availability. We agreed on getting her to mail it to me, as well as her cousins, and I would decorate them.

Here is my step by step process:


To start I laid the cap on top of the glitter scrapbook paper and traced.


After cutting off the excess I used my nifty knife to cut out a hole for the tab that holds the tassle.


I used pre-glued strips of pearls along the sides. The strips were purchased at Michaels craft store and they are in half which helps cut out bulkiness in the decorations. On my cap I simply stuck them on but everytime it was touched the pearl strip would fall off. To ensure the cap would mail well and stay on, I hot glued the ends and middle of each strip.


I used extra pearls to glue on the tab that holds the tassle. These DEFINITELY need to be hot glued down because the tassle will knock them off.


My friend wanted gold glitter and her cousin wanted silver glitter. 


Now it's time for the Monogram! I cut out a monogram decal around 6 inches to place in the middle. After struggling and wasting two monograms I called it a night and planned to head to Michaels the next morning.


The glitter scrapbook paper had chunky glitter and the decal wasn't able to stick to any smooth surface. I ripped off the old paper and replaced it with gold (and silver) paper with shimmer.


After re-decorating both caps they were ready for monograms. The first step is to center and place the monogram on the cap, obviously.


Next, I slowly pressed and peeled back the transfer tape.


Now this picture might look crazy, but its easily fixed with a knife.


Simply cut what overlaps the tab and throw it away.


And Voila! It's ready!


My friend wanted a bow like mine, you can see hers done below. Her cousin, however, didn't want a bow, but her school and year in the corner instead.


Friday, November 6, 2015

Lilly Pulitzer Inspired Pumpkins


If you've been reading up on blogs this past Halloween season you might have run across these particular pumpkins. My mom, Ramblings of a Southern Girl, loved the pumpkins I painted for my apartment and wanted to share them on her blog. Now being a child of a blogger you typically deal with:
1. Not being able to eat your dinner until a picture has been taken of it
2. Never quickly browsing a store, event, or any type of decor for that matter without waiting for a picture to be taken
3. Talking to your mom while she's on the computer and wondering if she's really listening or thinking of an adjective to describe her "fabulous" new flea market find

...but I digress.

When she asked I quickly agreed and sent pictures. Fast forward to about a week later and my pumpkins have gotten a ton of features. If you haven't seen Mom's post about them you can check it out here.


I thought I would give a little back story and walkthrough to these cheerful pumpkins. Even though I wish I could say I did, I didn't just get the brilliant idea to paint flamingos on a pumpkin in the middle of the fall. Like most things I do, I got my inspiration on Pinterest. While browsing I frequently say "Now why didn't I think of that!?" I said this very thing when I stumbled upon a picture of someone elses version of a flamingo Lilly pumpkin posted a few years ago. The flamingo idea came from the Lilly Pulitzer print above.

Here's a little behind the scenes action and step by step....

First I used a turquoise paint for the background. Here and there I made flamingo bodies in pink. At this point I was thinking "this might not turn out so well." I took a little bit of white paint and made faces and swirls "feathers" on their bodies. This was the point that I said "now I know this definitely won't turn out well." They were looking like a very creepy character from a Dr. Seuss book. After I added eyes and touched up the feathers, it was definitely turning out more flamingo like. Now I would comment on how I didn't paint too many flamingos so it wouldn't turn out too congested looking. ...In all honesty, I got lazy. So I quickly painted my pink tiny pumpkin, glittered the stem, and called it a night!


Hope you enjoyed my point of view on these adorable pumpkins! My poor pink pumpkin has been thrown out due to a bad case of molding and rot. However, my pretty flamingo pumpkin is alive and thriving. I keep telling myself that when it decides to die on me it will be a sign that it is time to put up Christmas decorations! And of course, I've already found a way for Lilly Pulitzer to creep into my Christmas decor. So stay tuned!


Monday, November 2, 2015

Step By Step: Lilly Pulitzer Jellies Be Jammin'


Clearly, from reading my blog, I am obsessed with two things: Lilly Pulitzer and crafts. I dabble in paint every now and then but I've never really mastered it. I'm more of a jack of all trades person when crafting ha. The Lilly Pulitzer prints look so intricate but can be easily broken down step by step. That's where I came up with this "series" of post's name. Today I started with one of top favorite prints, Jellies Be Jammin'.


I use the normal craft paint from Walmart by Apple Barn, Plaid.


To me the worst part is starting, so I break it down. I started with the Jelly Fish bodies in the light pink color, Pink Parfait.


Second, I add tentacles in the hot pink color, Fuchsia. They don't have to be perfect because they're just jelly fish.


 Next, I add tentacles in the light pink color, Pink Parfait. Now looking at the pictures I'm wondering why in the world I did the tentacle colors in the order that I did but it all comes out the same.


The last tentacles that I paint are the dots seen in the print, Jellies Be Jammin'. I used Pumpkin Orange and Lime Sherbet and dipped just the end of my paint brush to get perfect dots.


Lastly, I add the background. Now I would have usually painted the background first. However, for Lilly patterns you can see that it matches better to do the background last to show the white behind. I don't think this is a deliberate thing by Lilly. I think the print artist get that affect from using watercolor. But thats just the impression I get.


Cornhole boards I painted for myself in "Jellies Be Jammin'" and "Lobstah Roll" last summer.

Wednesday, July 29, 2015

Lilly Dupes


Lilly Pulitzer has been around for years but it seems the most popular now. Now that it has become popular, other brands are creating similar prints. I have found two current lookalikes this summer in the past month.    


The first is a pair of shorts I came across in Belk department store by their "Crown & Ivy" brand. I love this brand and the preppy style it portrays. They design prints with all types of animals such as  giraffes, elephants, bees, etc. These shorts were originally $40.00 and I scored them for just $20.00. They look a lot like Lilly's "Tusk in Sun" print and they are made with a PJ bottom feel.


The second pair of shorts I found were discovered at Old Navy. I've seen another lilly inspired print at Old Navy before but they didn't have my size. I was ecstatic to find these shorts on sale for just $8 at their 4th of July sale. They were originally priced at $24.94 and look like Lilly's "Sparks Fly" print.

If you know of any current Lilly lookalikes then leave a comment below!
Savannah

Monday, July 27, 2015

OOTD: Reef Me Up

I have been on the search for "vintage" Lilly lately and by vintage I mostly mean a few years old. My preferred method of this madness is searching #relilly on instagram. I love eBay but I hate having to fuss with bidding and waiting for it to sell blah blah blah. I want it now and for a good price! haha My first Lilly purchase on instagram was a Somerset dress in Bocce. However, I got a large and it was too big so I sold it to get my money back. My next purchase was in an interesting print that I had never seen before. 


The print is a Resort 2012 Lilly Pulitzer print called Reef Me Up. I scored the skirt for just $45. I have also never seen a skirt style by Lilly like this before. The skirt is a thin cotton material with an elastic waste. I paired it with a Buckhead Betty Navy silk top similar style of an Elsa. For jewelry I added an orange bubble necklace and matching earrings. I was wearing this outfit to work so I wore my summer "work" shoes which are gold sandals by "Me Too." I scored them for just $29 at Famous Footwear and they are so comfortable!


It was pure coincidence that my nails were orange but the color is LA Colors gel nail polish in Stunner.


The look together on, ignore my horrible mirror selfie quality haha

I hope you enjoyed my outfit as much as I did, Savannah


Wednesday, July 22, 2015

Apartment Series #2: Patio


When looking at apartments I made sure to check out the patio. I had good intentions on using my patio all the time to get air, grow plants, and enjoy during sunsets. Boy was I wrong, I do go out every day but just long enough to water the plants. I blame the fact that I'm on the first floor and the privacy just keeps me inside but in reality I just love inside too much after a day of work. Anyway, it at least looks cute to give a little incentive to go out.


I'm not one to shy away from color so I bought these cute bright green chairs at Lowes. The cute pillows came from Dollar General for $3 each. Yes you read that right, just $3 on sale!


I got my table from my great grandmas house and it was found under the carport rusting away in a white color. I freshened it up with a coat of black spray paint and it looks good as new!


Before-White and rusty


After-black and good as new!


My adorable flamingo in my pink plant came from Cracker Barrel and the mason jar light came from Big Lots. The light is battery operated and flickers like a real candle. This is the view it gives off at night. As always I hope you enjoyed my little space!

Savannah